Wednesday, December 11, 2013

DIY: Christmas Tree ( or any other design!) Napkin Rings using Silhouette

 
I had a different post planned for today, but then realized how fun this one would be:)  Plus, the weekly challenge on the Silhouette blog this week is a holiday item, so I needed to squeeze this in before they pick a winner on Friday!  For Thanksgiving I made a bunch of those pumpkin and leaf napkin rings (bottom of this picture) and loved how they turned out!  But I couldn't find any Christmas designs, so I decided to make my own!  To make this, I used the 3d moose and fir trees that were on sale a few weeks ago (but I'm pretty sure you could use any Christmas tree shape...or any other shape, for that matter!)
Open up the file.
 
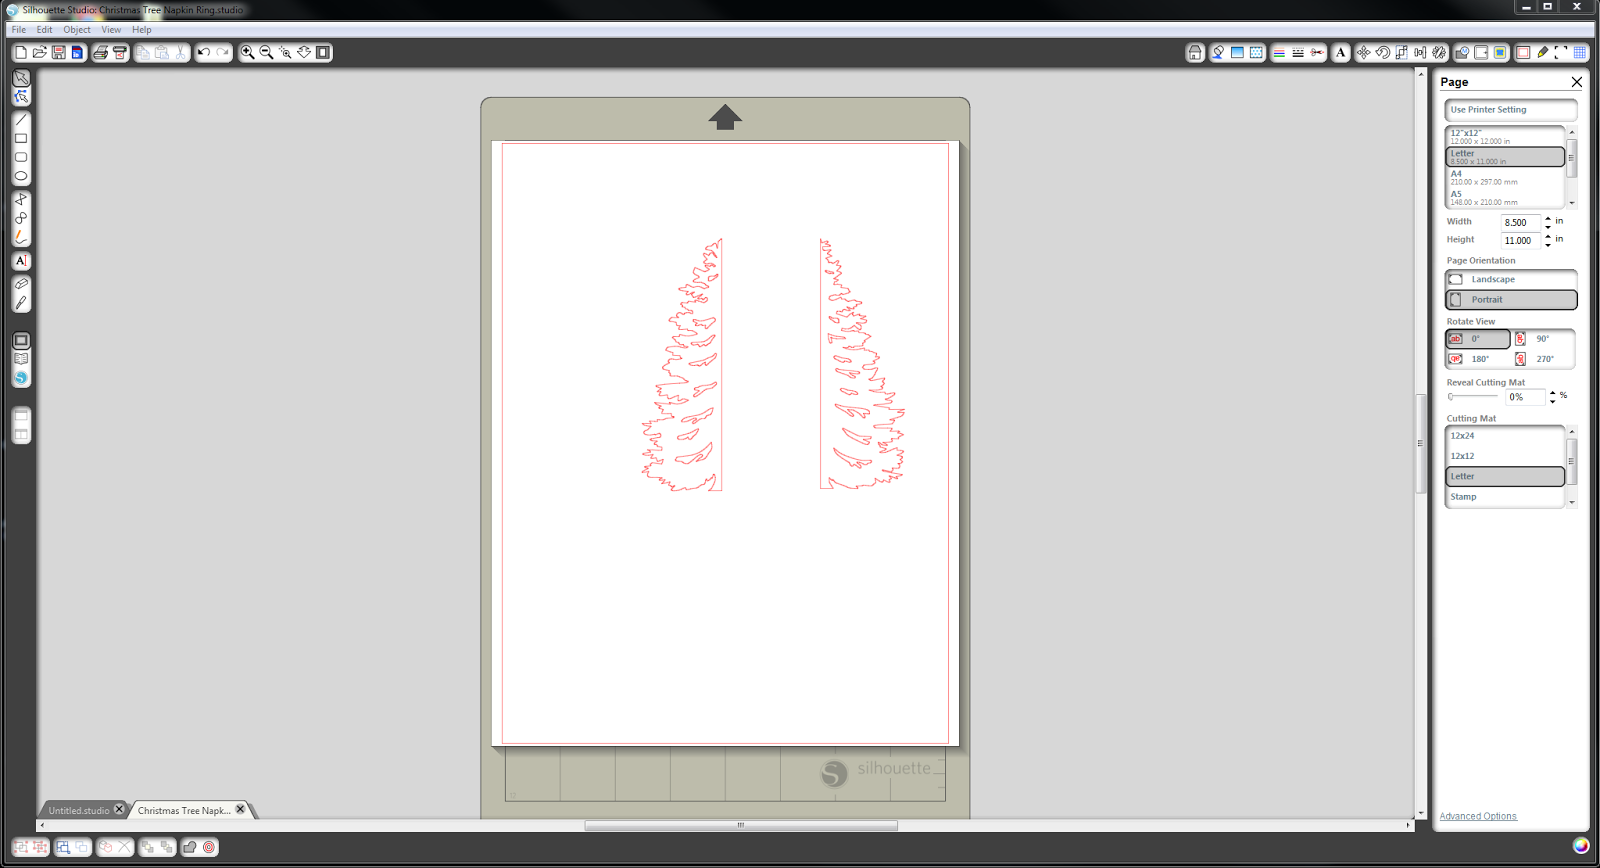
Since you won't be using the moose and the other part of the tree, you can ungroup and delete them.
Using the knife, draw a line down the center of the tree (there is already a dotted line so you can use that as a guideline).

Pull the two sides of the tree apart.
 
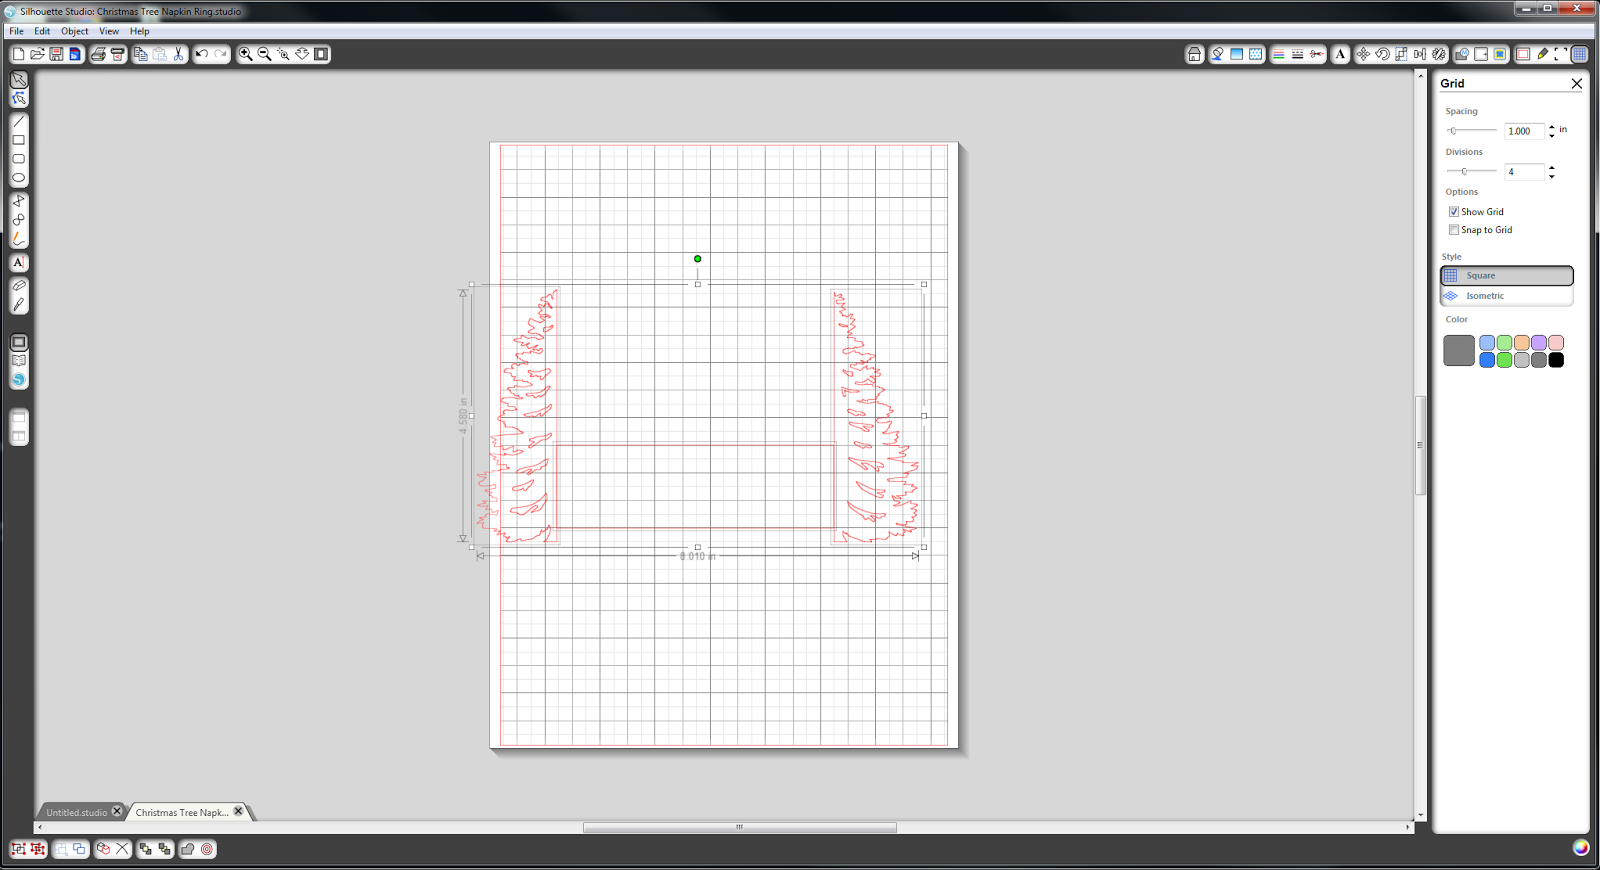
Draw a rectangle (for the two sizes of napkin rings that I made, my rectangles were 1.5x5 and 1x3.75).  The size of your tree should not matter to the structure.  It just depends on how you want it to look.
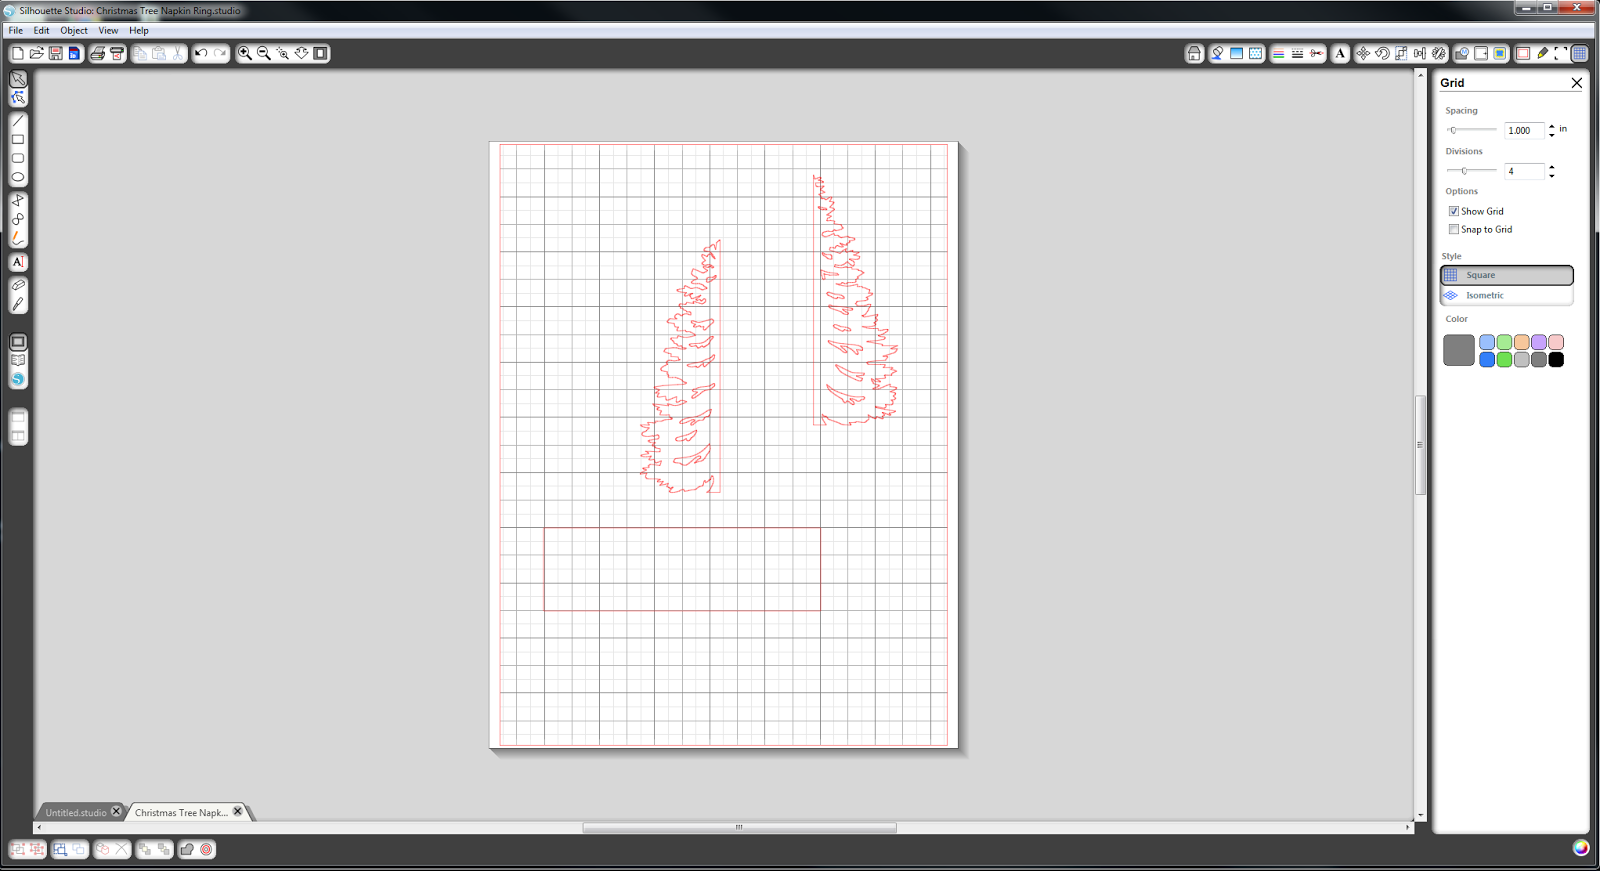
Place the Christmas tree pieces on either side of the rectangle (I suggest using the grid to make sure that they are even).

Highlight all of the shapes and select "merge".  This will only work if the trees line up perfectly on the edges of the rectangle.
You now have your napkin ring!  Last thing you need to do is add slits.
Using the knife, cut a line from one corner of the rectangle to about 2/3 down and the other corner to about 2/3 up.
Now send to silhouette and cut!  This project is super simple, but easily impresses guests;)

Like I said earlier, I made two different sizes.  The smaller one works for regular cotton napkins, and the bigger one for thicker cloth napkins.
 
 I think this design is perfect for a rustic inspired Christmas!
I would love to see pictures if you make these!
~Kelsey


Tuesday, December 10, 2013

A Few Favorites: Sugar Scrub


top: // 1 // 2 // 3 //
middle: // 1 // 2 //
bottom: // 1 // 2 // 3 //
"It's that time of year..."

You know, the time where your hands dry out and get all cracked if you don't pay attention to them?

Well, I guess that's not technically the next line of the song.  But sometimes, I feel like it should be;)

But don't worry!  Sugar scrub is here to help!  *Insert dramatic superhero music here*

With everything from pumpkin spice or chai tea, to fresh grapefruit and "French Country Morning", there is a scent of sugar scrubs for everyone!!!  Each of these shops has tons more scents of sugar scrub, plus soaps and other products.  So go explore!

~Kelsey

Tuesday, December 3, 2013

DIY: Bow Necklace

 
In case you don't know, there are few things that I love as much as I love polka dots.  They can be super casual or pretty formal.  I wear them with stripes, plaid, and floral (not all at the same time!!!;)  The same goes for chambray.  You can wear it with jeans or a comfy skirt.  This explains why you have seen this shirt a few times and will keep seeing it until I wear it out completely.  And you know what goes perfectly with this yummy polka dotted chambray shirt?  A bow tie necklace.
I absolutely love bow ties (almost as much as I love suspenders.  Oh, and polka dots;).  And this is the perfect feminine form of a bow tie.  A while back I got a Michael's gift card from my brother.  (He knows me so well that he not only got me a crafty GC but he addressed it "To: Wendy, From: Peter [Pan]"...#melt)  Anyways, as soon as I walked into Michael's, I saw this necklace in the jewelry section.  I didn't have any plans yet what to put on it, but I knew I had to grab it.  And, well, eventually the inspiration came to me!  What better than a bow?  Or better yet, a BUNCH of bows that I could change out with different outfits?  I couldn't find this exact necklace on Michael's, but I'm sure you could find them on Etsy or something.  Anywhoo.......
 
First you will need to cut out your fabric.  The larger piece will need to be 3x as tall and 2x was wide as you want your bow (obviously, this just depends on how big you want yours to be).  The smaller needs to be 2-3 inches and about 3x as wide as you want the final (the smaller is the piece that goes in the middle).
 
Also, you can either sew or hot glue gun this project.  I did bows with both techniques.  Obviously, the hot glue gun is the fastest for if you just want to whip up a new bow for a different outfit.  However, if you are giving this as a gift, I would recommend sewing because it obviously gives it a cleaner finish.  This tutorial is for hot glue gunning it, but the sewing is pretty much the same.

First of all, fold your larger piece 1/3 of the way up from the bottom and glue.  Fold the top down 1/3 of the way down (just to the bottom edge) and glue it down as well.
 
Fold fabric over from left to right to the center and glue.
 
(There will be an opening from the beginning, you can glue that closed if you want.)

Fold the rest of the fabric over from right to left and glue down on top of the other side.

Squish!!!  Now flip it over so that the "seam" is on the inside.
 
Now take your little piece...

Fold it in thirds and glue down
 
Bigger piece: squeeze it in the center until you have the perfect bow shape.  See that line between my fingers?  You need to glue that as well.
 
Glue and..........

SQUISH!!!!

Repeat for the back as well (you will need to glue in two spots).
 
Now wrap your smaller piece around the center, with the ends on the back of the bow.
 
Glue one end on top of the other!

And now you have a bow!!!

To attach the bow to the necklace, I just put jump rings through the edges.
And now you can attach your bow to your necklace!
 

Tada!!!!


There are obviously endless possibilities of fabrics for this project.  This one ^ is my absolute favorite.  I love how it can work in both spring and fall! 

Where are you getting your crafty inspiration from lately?

~Kelsey


DIY: Quick Felt Coffee Cozies

Do you ever see a picture online *cough cough Pinterest* that just jumps at you?  I mean, there's always really cool stuff going by on Pinterest.  But sometimes certain pictures just seem to pop.  I don't know if it's the color or the project, or just the photography in general, but this was one pic that immediately caught my eye.

Ok, so I love felt, I love ombre, I love coffee, and I love projects that take 30 minutes tops.  And I also love the fact that this project is from a mostly crocheting blog.  Dontcha just love it when people step outside of their crafty boundaries and try something new?  (Along those lines, I might be learning crocheting soon so that I can try some of the projects on this site:)
Yesterday I posted this picture on IG (find me @fancythatnotion) as a sneak peek of what would be up today!
So here is my version of these super easy coffee cozies.  I made nine out of three different colored felts for the ombre look, and they took me less than 30 minutes total.  Like it says on the tutorial, an assembly line process is the best way to go.  And thanks to some Black Friday deals, this cost me less than $2 and I still have extra felt (Shhhhh, don't tell anyone!!!)  Don't you think this would make the perfect stocking stuffer?  I might be including these in some small Christmas packages for friends this year (so if you get one, act surprised;)

 
Are you making any homemade gifts for Christmas this year?  I would love to hear about them!
~Kelsey


Sunday, December 1, 2013

A Few Favorites: "Alternative" Christmas Trees

The other day my sisters were talking about Christmas trees.  Our house has a vaulted ceiling, so we always end up with a pretty large tree.  Like, 16 feet large.  For some of us, this is just tradition that we expect every year.  We know for a fact that we will always push the Christmas tree over to our open, second-story loft to decorate the top.  For others, this is a nightmare (cue said 16 foot tree [ornaments, lights, water, and all] crashing on the floor above us in the middle of the night.  Yep, nightmare).  One of my sisters stated that she is going to have a nice 6-footer every year when she has her own house.  To everyone's shock, I said that "I'm not going to have a Christmas tree."  Then I clarified by saying, "I'm going to have like 30 of them!!!"  I love this trend of "alternative" Christmas trees.  If you want to change it up and make your tree out of a ladder instead of having to slog through the mud to cut one down in the pouring rain (hint hint, Washingtonians), you can go right ahead.  Or if you're like me and just want Christmas trees everywhere, there are so many different options!  And since we only have 24 more days until Christmas (eek!), I thought I'd share 24 Christmas tree ideas with you!
 
Have you made any alternative Christmas trees?  I saw one on Pinterest that I really want to make, made of white cupcake liners.  Hmm.......couldn't find the link.  But you can find the picture on my Christmas Tree board.
 
~Kelsey
 

Tuesday, November 19, 2013

A Few Favorites: Cozy Fall Night

Don't you just love those cozy fall nights?  Rain pounding on the roof, a warm drink in hand, and wrapped up all snug?  These would make the perfect late November evening curled up on the couch.  Can't you already smell that hazelnut coffee candle???
 
~Kelsey

Monday, November 18, 2013

DIY: Antique Book Pumpkins

 
Well hello there!  Today I have my second of three Thanksgiving posts.  On Saturday I gave you some ideas for name cards, and today I have the perfect centerpiece for your table!

This idea came from a lady in California who passed it on to my sister, who passed it on to me, and now I'm passing it on to you!:)
 
You already know how much I love thrifting, right? What do they say, "Name brands at Walmart prices?"  I'm all for it.  But this thrifting shopping trip with my sister was all for the sake of crafting.  First we picked out some books for our pumpkins.  (I had to go with some vintage ones to get those awesome covers).  We ended up with some old fiction, a German dictionary, books on the Alps, dog attractions in California, and how to groom your poodle......random right?  (Oh, and of course I had to pick up that Sense and Sensibility...who could resist?  But don't worry, we didn't cut it up for a pumpkin.)

And this belt-turned-boho-headband.  (Super simple.  Just pulled a few stitches to remove the buckle and re-glued the leather to cover up the braid).  All for a whopping 99 cents.

 Alrighty.  Enough about my love for thrifting.  On to the pumpkins.  To begin with, remove the cover from your book.  It is easiest with paperbacks, because you can just slowly rip it off.  Just make sure to not break the binding.  Next, draw half of a "pumpkin shape" on the first page of the book.  Cut through a few pages with your scissors.
 

Once you have cut the first layer, trace that outline onto the next page and cut a few pages.  Continue doing this until you have gotten through the whole book!

As you are cutting, try to make sure that your pages are not getting bigger or smaller.

It will be hard to cut close to the seam of the book, but don't worry.  You can cut all of that off at the end.
As you can see, you'll be cutting through a lot of paper!!!  When you have cut through your whole book, hot glue gun the front and back cover of the book together.  (Cover the entire page with glue so that it will stick really well).  When that glue has dried, glue a short stick into the hole on top of the pumpkin (see pictures below).  And now you have an adorable little pumpkin!


For this centerpiece, Lara spray painted some big fall leaves gold and sprinkled nuts and pinecones around.


Don't you just love how a little gold spray paint can add some sparkle to any project?


Do you have a Thanksgiving centerpiece made up yet?


~Kelsey
 
Linking up:
More the Merrier Monday

Photobucket